Create the SharePoint Online app and associated website
The first step was to determine if SignalR even works in a SharePoint app. One option was to do a bunch of research to try and discover if it would work. A more fun option would be to just give it a go.
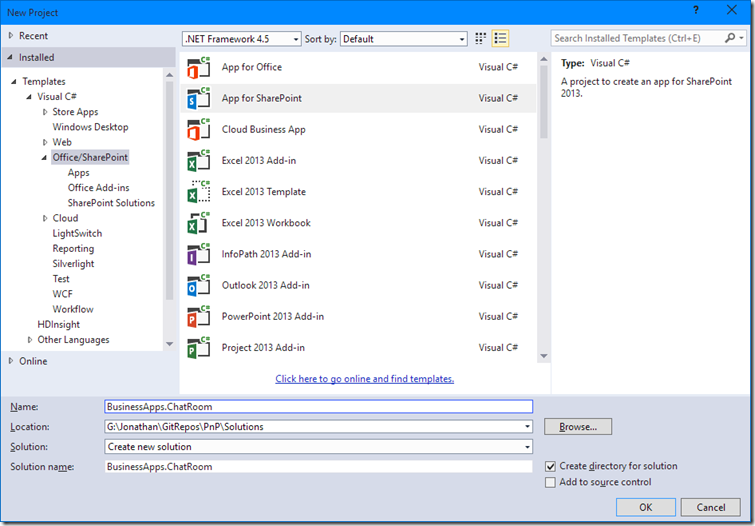
Step one: Create an App for SharePoint project.
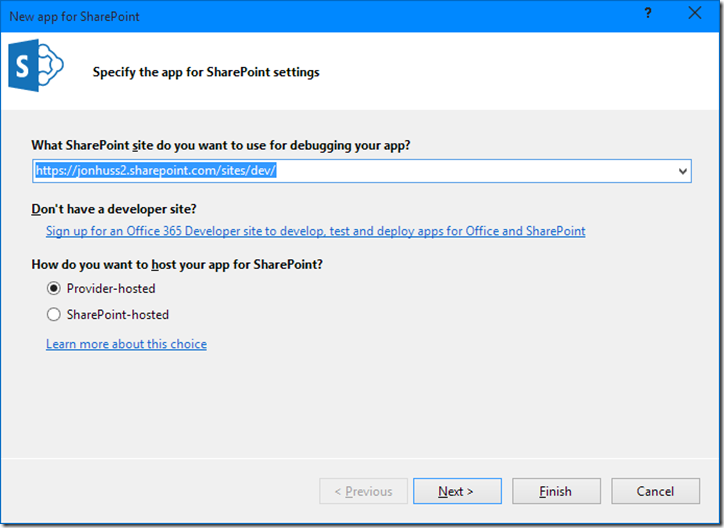
Next, select the SharePoint site to use during development and the type of app. In this case, I’m going to choose a Provider-hosted app, because we want to host it in Azure.
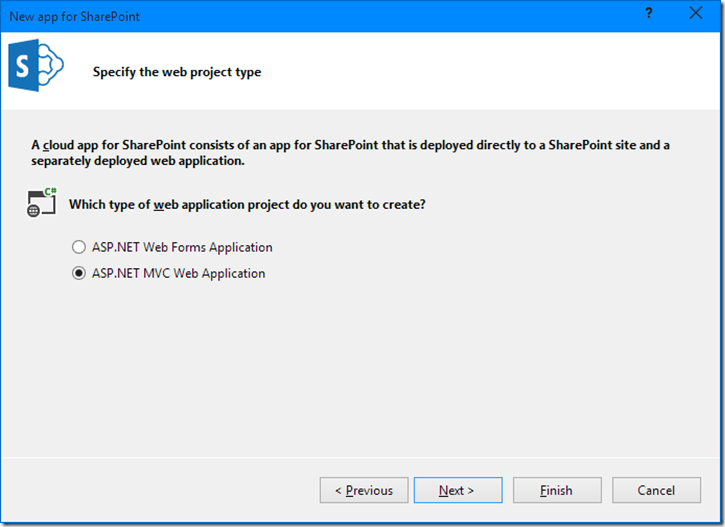
Next, choose the web project type. I’m a huge fan of MVC, so I’m going to use that.
Finally, we’re going to use Windows Azure ACS for the authentication.
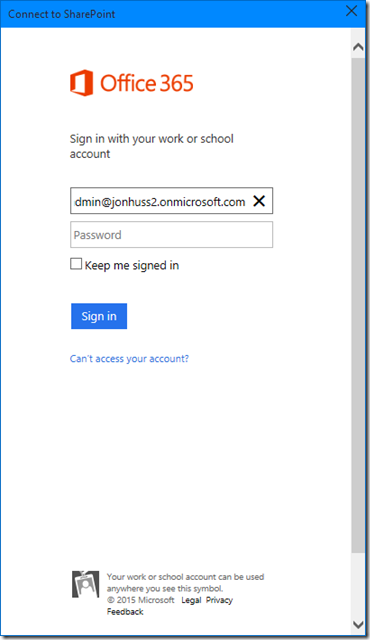
Visual Studio will ask to login to our development tenant so that it can deploy our app automatically. We’ll do that.
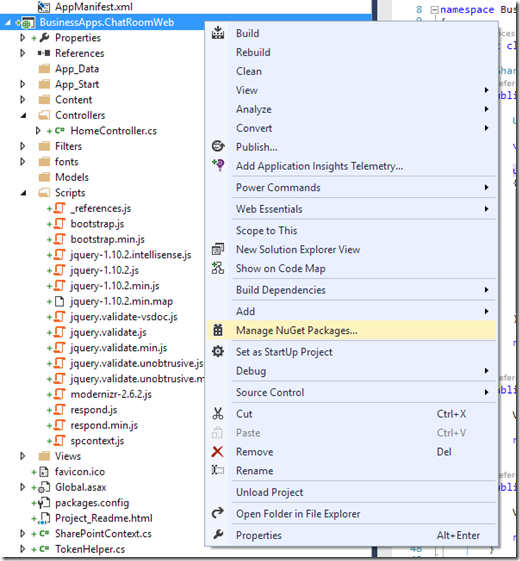
Now that our SharePoint app has been created, let’s add the necessary SignalR NuGet packages. Start by right clicking on the Web project and selecting “Manage NuGet Packages…”
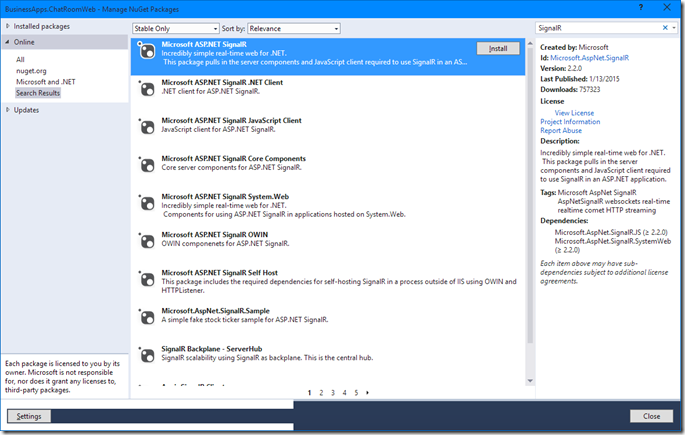
Find the Microsoft ASP.NET SignalR package and install it. It’s going to install a bunch of other packages as dependencies. That’s ok.
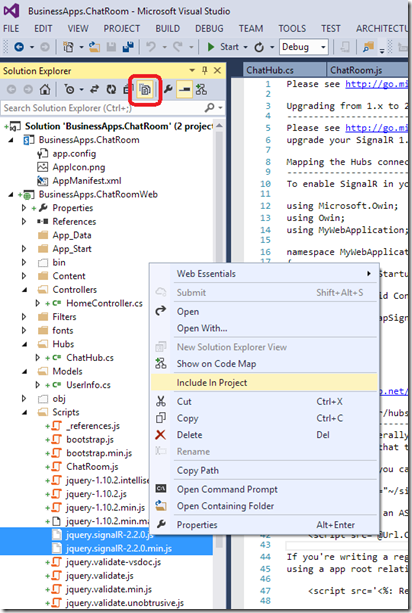
Note: After installing the SignalR NuGet package, for whatever reason, the related .js files weren’t actually included in the project. However, if I click the “Show All Files” button in the Solution Explorer, they show up and I can then select them, right click and select “Include In Project”:
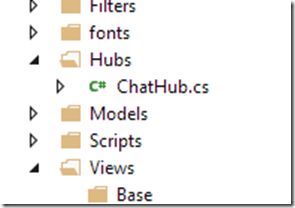
Next, we need to create a SignalR Hub. Start by creating a new Hubs folder in the web project and then adding a class to that named “ChatHub”.
Our chat room is going to support three operations: joining the chat room, sending messages, and leaving the chat room. So, first we’ll have our ChatHub inherit from the Microsoft.AspNet.SignalR.Hub class, and then we’ll add the necessary functions to support our operations. The context.Clients.All object is dynamic, so the functions can be named whatever we like here without having to actually define them anywhere else.
using System;
using System.Collections.Generic;
using System.Linq;
using System.Web;
using Microsoft.AspNet.SignalR;

namespace BusinessApps.ChatRoomWeb.Hubs
{
    public class ChatHub : Hub
    {
        public void PushMessage(string userName, string photoUrl, string timestamp, string message)
        {
            IHubContext context = GlobalHost.ConnectionManager.GetHubContext<ChatHub>();
            context.Clients.All.pushMessage(userName, photoUrl, timestamp, message);
        }

        public void JoinRoom(string userName)
        {
            IHubContext context = GlobalHost.ConnectionManager.GetHubContext<ChatHub>();
            context.Clients.All.joinRoom(userName);
        }

        public void LeaveRoom(string userName)
        {
            IHubContext context = GlobalHost.ConnectionManager.GetHubContext<ChatHub>();
            context.Clients.All.leaveRoom(userName);
        }
    }
}
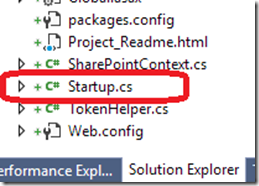
We also need to create a Startup.cs class in the main web project that we can use to tell the app to configure SignalR.
Then, we’ll add the following code to that Startup.cs class:
using Microsoft.AspNet.SignalR;
using Microsoft.Owin;
using Owin;

[assembly: OwinStartupAttribute(typeof(BusinessApps.ChatRoomWeb.Startup))]
namespace BusinessApps.ChatRoomWeb
{
    public partial class Startup
    {
        public void Configuration(IAppBuilder app)
        {
            app.MapSignalR();
        }
    }
}
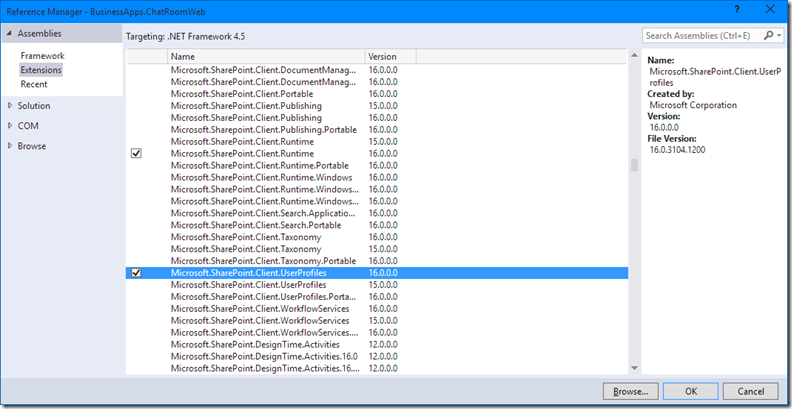
Since we decided that we want to use SharePoint to gather some information from the user, we’ll make use of the PeopleManager and PersonProperties classes. To gain access to those classes, we need to add a reference to Microsoft.SharePoint.Client.UserProfiles to our Web project.
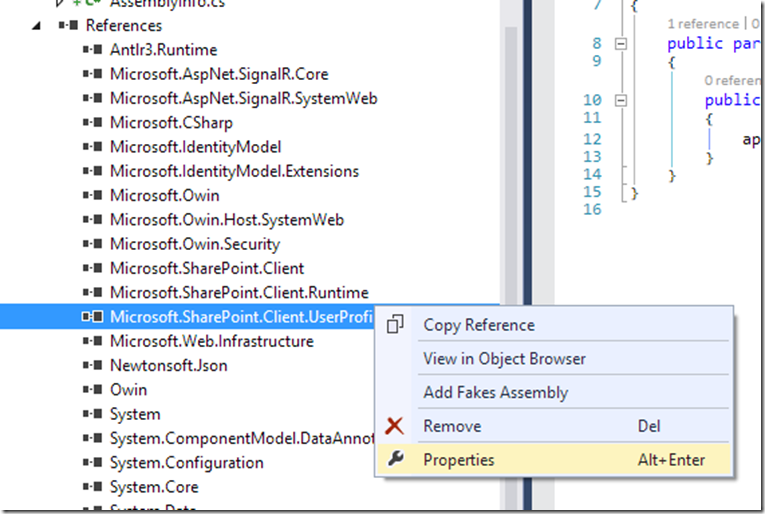
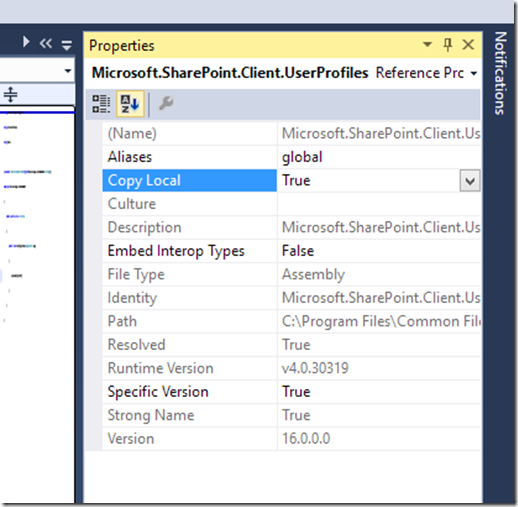
After the Microsoft.SharePoint.Client.UserProfiles library has been added to the project, expand the References of the Web project, right click the Microsoft.SharePoint.Client.UserProfiles library, and select properties:
In the Properties window, change ‘Copy Local’ to True (this is necessary for the deployment to Azure later):
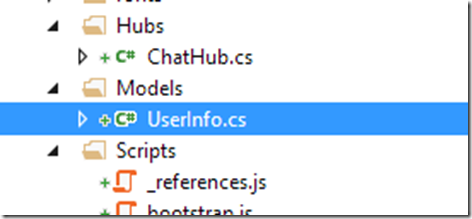
We also need to have a class where we can store all of the SharePoint information that we retrieved so we don’t have to look it up in SharePoint all the time. So, we’ll add a UserInfo.cs class to the Models folder:
Inside the UserInfo class, we’ll just create a few properties to store some information about the user:
using System;
using System.Collections.Generic;
using System.Linq;
using System.Web;

namespace BusinessApps.ChatRoomWeb.Models
{
    public class UserInfo
    {
        public string DisplayName { get; set; }
        public string PhotoUrl { get; set; }
        public DateTime LastPing { get; set; }
    }
}
Now we’ll make our way to our HomeController.cs. This is where most of the work happens. The following functions are contained in the class:
- Index(): This is the default Action of the controller. In this function, we’ll instantiate our new ChatHub, lookup and cache the current user’s details, and finally return the page for our chat room.
- SendMessage(string message): This function is called from our chat room when the user clicks ‘Send’ or hits the Enter key. The function receives the message, retrieves the sending user’s details, and finally pushes the message out to all the other members of the chat room.
- JoinRoom(): This function is automatically called from the chat room when the /Home/Index view is rendered. The idea here is that if the page renders, then a user has joined the room. The function gathers the user’s details from the cache and pushes a message out to all of the other members in the chat room.
- LeaveRoom(): This function is also automatically called, except this time it’s called when a user leaves leaves the Home/Index page, or when the users cache times out. The function gathers the user’s details from the cache and pushes a message out to all of the other members in the chat room.
- Ping(): This function is called from a JavaScript function on an interval of 20 seconds. Calling the Ping function serves two purposes: a) it tells the system that the user is still in the chat room and b) it prevents the SharePoint token from expiring.
- GetUserDetails(): This is where the interesting bits happen in terms of working with SharePoint. In this function, we’ll use the PeopleManager and PersonProperties classes to retrieve information about the user, and then use that information to create a URL to retrieve the user’s profile photo. We’ll store all of that information in a cache that has a sliding expiration window of 3 minutes. Each time a user sends a Ping(), the sliding cache window is reset. So, depending on where the window lands exactly, if the user misses 8 or 9 Ping()s in a row the timeout will expire and we’ll assume they’ve left the chat room.
- CacheRemovalCallback(string key, object value, CacheItemRemovedReason reason): This is the function that’s called by the cache when a user’s cache entry expires. In this function, we just take the user’s details that were stored in the cache to push a message out to the members of the chat room that the user has left the room.
The entire class looks like this:
using BusinessApps.ChatRoomWeb.Hubs;
using BusinessApps.ChatRoomWeb.Models;
using Microsoft.SharePoint.Client;
using Microsoft.SharePoint.Client.UserProfiles;
using System;
using System.Collections.Generic;
using System.Linq;
using System.Web;
using System.Web.Caching;
using System.Web.Mvc;

namespace BusinessApps.ChatRoomWeb.Controllers
{
    public class HomeController : Controller
    {
        private static ChatHub _chatHub;

        [SharePointContextFilter]
        public ActionResult Index()
        {
            if (_chatHub == null)
                _chatHub = new ChatHub();

            GetUserDetails();

            return View();
        }

        [SharePointContextFilter]
        public void SendMessage(string message)
        {
            if (Session["UserAccountName"] == null || HttpRuntime.Cache[Session["UserAccountName"].ToString()] == null)
                GetUserDetails();

            UserInfo userInfo = (UserInfo)HttpRuntime.Cache[Session["UserAccountName"].ToString()];

            _chatHub.PushMessage(userInfo.DisplayName, userInfo.PhotoUrl, DateTime.UtcNow.ToString(), message);
        }

        [SharePointContextFilter]
        public void JoinRoom()
        {
            if (Session["UserAccountName"] != null)
            {
                UserInfo userInfo = (UserInfo)HttpRuntime.Cache[Session["UserAccountName"].ToString()];
                _chatHub.JoinRoom(userInfo.DisplayName);
            }
        }

        [SharePointContextFilter]
        public void LeaveRoom()
        {
            if (Session["UserAccountName"] != null)
            {
                UserInfo userInfo = (UserInfo)HttpRuntime.Cache[Session["UserAccountName"].ToString()];
                _chatHub.LeaveRoom(userInfo.DisplayName);
            }
        }

        [SharePointContextFilter]
        public void Ping()
        {
            if (Session["UserAccountName"] != null && HttpRuntime.Cache[Session["UserAccountName"].ToString()] != null)
            {
                ((UserInfo)HttpRuntime.Cache[Session["UserAccountName"].ToString()]).LastPing = DateTime.Now;
            }
        }

        private void GetUserDetails()
        {
            var spContext = SharePointContextProvider.Current.GetSharePointContext(HttpContext);

            using (var clientContext = spContext.CreateUserClientContextForSPHost())
            {
                if (clientContext != null)
                {
                    PeopleManager peopleManager = new PeopleManager(clientContext);
                    PersonProperties properties = peopleManager.GetMyProperties();
                    clientContext.Load(properties);
                    clientContext.ExecuteQuery();

                    UserInfo userInfo = new UserInfo()
                    {
                        DisplayName = properties.DisplayName,
                        PhotoUrl = spContext.SPHostUrl + "/_layouts/userphoto.aspx?accountname=" + properties.Email,
                        LastPing = DateTime.Now
                    };

                    HttpRuntime.Cache.Add(properties.AccountName, userInfo, null, Cache.NoAbsoluteExpiration, new TimeSpan(0, 3, 0), CacheItemPriority.Normal, new CacheItemRemovedCallback(CacheRemovalCallback));

                    Session["UserAccountName"] = properties.AccountName;
                }
            }
        }

        private void CacheRemovalCallback(string key, object value, CacheItemRemovedReason reason)
        {
            _chatHub.LeaveRoom(((UserInfo)value).DisplayName);
        }
    }
}
Ok, now we’re done with the server side stuff. Sweet! Next we need to create the client side View and JavaScript and we’ll be all done building the chat room website!
We’ll make our way to the _Layout.cshtml file under /Views/Shared. Since this is going to be a SharePoint app, we don’t want all of the extra chrome that default ASP.NET MVC apps provide. We’ll remove all of that and just leave the bare bones markup behind, like so:
<!DOCTYPE html>
<html>
<head>
    <meta charset="utf-8" />
    <meta name="viewport" content="width=device-width, initial-scale=1.0">
    <title>@ViewBag.Title - My ASP.NET Application</title>
    @Styles.Render("~/Content/css")
    @Scripts.Render("~/bundles/modernizr")
</head>
<body>
    <div class="container body-content">
        @RenderBody()
    </div>

    @Scripts.Render("~/bundles/jquery")
    @Scripts.Render("~/bundles/bootstrap")
    @Scripts.Render("~/bundles/spcontext")
    @RenderSection("scripts", required: false)
</body>
</html>
Next, find the Index.cshtml file under /Views/Home. This is where we’ll create the actual chat room itself and wire it up to the necessary JavaScript bits. The markup looks like this:
@{
    ViewBag.Title = "Home Page";
}

<div id="chat-room">
    <div id="message-window">
    </div>

    <div id="message-box">
        <textarea onkeyup="KeyUp(event)"></textarea>
        <input type="button" onclick="SendMessage()" value="Send" />
    </div>
</div>

@section scripts {
    <script src="~/Scripts/jquery.signalR-2.2.0.js"></script>
    <script src="~/signalr/hubs"></script>
    <script src="~/Scripts/ChatRoom.js"></script>
}
The most confusing bit of this code for me had to do with the /signalr/hubs script reference. What in the world is that? It turns out that SignalR will create a client proxy for us on the fly which simplifies our client side code. This is that proxy. You can find more information on the proxy at http://www.asp.net/signalr/overview/guide-to-the-api/hubs-api-guide-javascript-client#clientsetup.
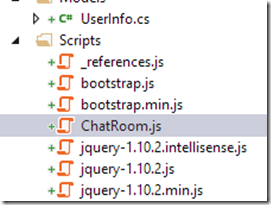
Also notice the reference to ChatRoom.js. This is the JavaScript file that I created to support SignalR and the UI. Let’s create the ChatRoom.js file under the Scripts folder:
That file contains the following functions.
- StartHub(): This function is called as soon as the page has rendered. It binds the functions that we created in our ChatHub.cs file to the JavaScript functions that will be executed. We also startup the SignalR hub.
- SendMessage(): This is the function that’s called when the user clicks the Send button in the UI. It makes an AJAX call to /Home/SendMessage, passing the necessary SharePoint URLs and the user’s message.
- ReceiveMessage(userName, photoUrl, timeStamp, message): This function is called when the ChatHub.cs/PushMessage is called. This function receives the information that was sent as part of the message, injects it into some HTML, and finally adds that HTML to the chat window.
- ReceiveJoinRoom(userName): This function is similar to ReceiveMessage, except that it receives the JoinRoom message and adds it to the chat window.
- ReceiveLeaveRoom(userName): This function is exactly like ReceiveJoinRoom, except that it receives the LeaveRoom message.
- JoinRoom(): This function is called automatically when the /Home/Index page is loaded to tell other members of the chat room that a user has joined the room. The AJAX call in this function calls into HomeController.cs/JoinRoom().
- LeaveRoom(): This function is called when the user leaves the /Home/Index page to indicate that they have left the chat room. The AJAX call in this function calls into HomeController.cs/LeaveRoomRoom().
- AddMessage(html): This is a helper function that adds HTML to the chat window. It also auto scrolls the chat window so the most recent messages are always displayed at the bottom of the window.
- KeyUp(e): This is the function that’s called when KeyUp event is fired in the text area where the user types their message and allows the user to hit the Enter key rather than having to click ‘Send’.
- Ping(): This is the function that’s fired every 20 seconds to indicate that the user is still in the chat room. The AJAX call in this function calls into HomeController.cs/Ping().
The entire ChatRoom.js file looks like this:
function StartHub() {
    var chatHub = $.connection.chatHub;

    chatHub.client.pushMessage = function (userName, photoUrl, timeStamp, message) {
        ReceiveMessage(userName, photoUrl, timeStamp, message);
    };

    chatHub.client.joinRoom = function (userName) {
        ReceiveJoinRoom(userName);
    };

    chatHub.client.leaveRoom = function (userName) {
        ReceiveLeaveRoom(userName);
    };

    $.connection.hub.start();
}

function SendMessage() {
    var textBox = $("#message-box textarea");

    if (textBox.val() != "") {
        $.ajax({
            type: "GET",
            url: "/Home/SendMessage" + location.search + "&message=" + textBox.val(),
            cache: false
        });

        textBox.val("");
    }

    textBox.focus();
}

function ReceiveMessage(userName, photoUrl, timeStamp, message) {
    var localTimeStamp = new Date(timeStamp + " UTC");

    AddMessage(
        '<div class=\'message\'>' +
            '<img class=\'message-sender-image\' src=\'' + photoUrl + '\' alt=\'Photo of ' + userName + '\'/>' +
            '<div class=\'message-right\'>' +
                '<div class=\'message-sender\'>' + userName + '</div>' +
                '<div class=\'message-timestamp\'>' + localTimeStamp.toLocaleTimeString() + '</div>' +
                '<div class=\'message-content\'>' + message + '</div>' +
            '</div>' +
        '</div>'
        );
}

function ReceiveJoinRoom(userName) {
    AddMessage(
            '<div class=\'system-message\'>' +
                userName + " has joined the room." +
            '</div>'
            );
}

function ReceiveLeaveRoom(userName) {
    AddMessage(
            '<div class=\'system-message\'>' +
                userName + " has left the room." +
            '</div>'
            );
}

function JoinRoom() {
    $.ajax({
        type: "GET",
        url: "/Home/JoinRoom" + location.search,
        cache: false
    });
}

function LeaveRoom() {
    $.ajax({
        type: "GET",
        url: "/Home/LeaveRoom" + location.search,
        cache: false
    });
}

function AddMessage(html) {
    $('#message-window').append(html);

    $("#message-window").animate({
        scrollTop: $("#message-window")[0].scrollHeight
    });
}

function KeyUp(e) {
    if (e.keyCode === 13 || e.which === 13) {
        SendMessage();
    }
}

function Ping() {
    $.ajax({
        type: "GET",
        url: "/Home/Ping" + location.search,
        cache: false
    });
}

StartHub();

setInterval(function () { Ping() }, 20000);

window.onload = function () { JoinRoom() }
window.onunload = function () { LeaveRoom() }
The last thing we need to do in terms of UI is update the /Content/Site.css file so that our controls will be rendered appropriately. The entire CSS file now looks like this:
body {
    padding-top: 50px;
    padding-bottom: 20px;
    height: 800px;
    font-family: "Trebuchet MS",Arial,Helvetica,sans-serif;
}

/* Set padding to keep content from hitting the edges */
.body-content {
    padding-left: 15px;
    padding-right: 15px;
    height: 100%;
}

/* Override the default bootstrap behavior where horizontal description lists
   will truncate terms that are too long to fit in the left column
*/
.dl-horizontal dt {
    white-space: normal;
}

#chat-room {
    width: 100%;
    height: 100%;
}

#message-window {
    width: 100%;
    height: 80%;
    overflow-y: scroll;
    border: solid 1px black;
}

#message-box {
    height: 15%;
    border: solid 1px black;
}

#message-box textarea {
    width: 90%;
    height: 100%;
    overflow-y: scroll;
}

#message-box input[type=button] {
    width: 10%;
    height: 100%;
    background-color: darkblue;
    color: white;
    float: right;
}

.message {
    width: 100%;
    padding-bottom: 2%;
    min-height: 13%;
    clear: both;
}


.message-sender-image {
    height: 8%;
    width: 8%;
    float: left;
    margin-left: 1%;
    margin-top: 1%;
}

.message-right {
    float: right;
    width: 91%
}

.message-sender {
    color: blue;
    float: left;
    padding-left: 1%;
    padding-top: 1%;
}

.message-timestamp {
    float: right;
    color: blue;
    padding-right: 1%;
    padding-top: 1%;
}

.message-content {
    clear: both;
    padding-left: 1%;
    padding-top: 1%;
    -ms-word-wrap: break-word;
    word-wrap: break-word;
}

.system-message {
    width: 100%;
    padding-right: 1%;
    padding-top: 1%;
    padding-left: 1%;
    padding-bottom: 1%;
    min-height: 1%;
    clear: both;
    color: red;
    font-style: italic;
}
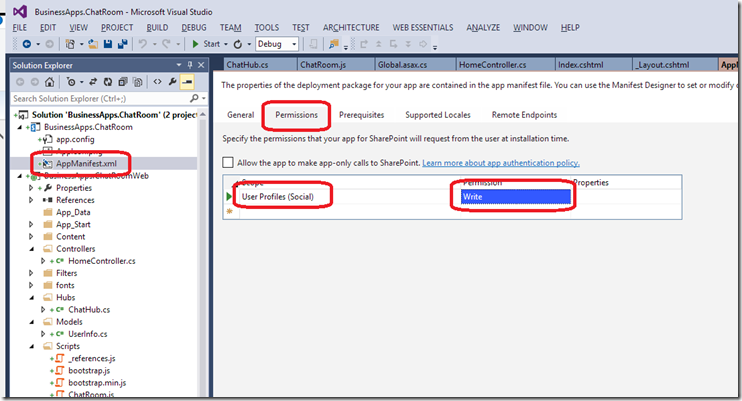
That’s it! We’re done with our coding. Now, one last step before we give our flashy new chat room a test drive. We need to give the app permissions to Write (even though we’ll only be reading data) to the User Profiles in SharePoint. To do that, we’ll open the AppManifest.xml file, navigate to the Permissions tab, select User Profiles (Social), and set the Permission to Write:
Part 1: Create the SharePoint Online app and associated website
Part 2: Test the app in Visual Studio
Part 3: Create the SharePoint Online web part
Part 4: Deploy the site to Azure
![image_thumb111[1] image_thumb111[1]](https://www.jonathanhuss.com/wp-content/uploads/2015/04/image_thumb1111_thumb.png)
